

Friday 10 December 2010

Spirit of Christmas
Tutorial written by and © to Bits N Bobs 10th December 2010.
Results are for personal use only.
No monetry gain allowed and that includes placing them behind a paid or donation based membership area.
You are not allowed to share/forward or translate any of my tutorials or place them on any blog, website, DVD or anywhere else without my permission.
These tutorials are written from my own ideas and any similarities to any other tutorial is purely coincidental.
All tutorials are for those with a working knowledge of paintshop pro.
I reserve the right to amend these terms at any time.
Supplies needed.
Font of choice for your name and text.
I am using Santa's big secret
Tube of choice.
I am using Dressed for Santa from MyTubedArt
Tubes are not to be used without an MTA licence
Mask of choice.
I am using GabeeChristmas6 which you can download here
Scrap kit Spirit of Christmas by Gemini Creationz
Scraps I am using from this kit are
Paper 7, Frame5, Tree01, Glitter02, Stars, Bow4
Plugins used
Eyecandy4000 - hsb noise - only needed for animation.
Note
This tutorial was written in PSP 9
Open all supplies in paintshop except the font.
Double click on your font and minimize.
1.Open a new image 500 X 500 at 72 dpi
Re-size your paper to 500 pixels wide,
Copy, paste as a new layer
Layers/ New mask layer/ from image,
Find your mask image,
Source luminance tabbed, Invert mask data untabbed.
Ok.
Layers/ merge group, Layers/ duplicate layer, Merge/ Merge visible.
2.Re-size your frame to 350 pixels wide
Copy, paste onto your image as a new layer,
Using your raster deform tool drag the top of your frame
so the shape is similar to your mask image.

3.Re-size tree01 to 4000 pixels high,
Copy, paste onto your image as a new layer,
Position to your liking.
4.Activate frame layer
Selections/ select all, float, defloat
Activate tree layer and erase the bottom part of the tree.
Selections/ select none.
5.Re-size glitter02 to 400 pixels high
Copy, paste onto your image as a new layer,
Layers/ arrange/ move down, edit/ repeat.
6.Activate your frame layer.
Re-size your stars to 250 pixels high,
copy and paste as a new layer.
Position to your liking.
7.Re-size your bow to 100 pixels high,
copy and paste as a new layer.
Position to your liking.
8.Activate your top layer.
Re-size your tube to 400 pixels high,
copy and paste as a new layer.
Position to your liking.
9.Add a drop shadow of choice to all layers
making sure you end with your tube layer.
I am using V3, H3, O100, B9, #000000
Layers/ new raster layer/ add all copyright info.
PLEASE NOTE:
If you do not wish to animate you can add your name and save your tag now.
10.Activate your mask layer.
Duplicate this layer twice so you have 3 of them.
Activate the bottom one,
Effects/ 3D effects/ eyecandy4000/ settings as below.

Close this layer and activate the middle duplicate.
Use the same settings but this time hit the random seed button once then click ok.
Close this layer and activate the last duplicate.
Repeat the effect hitting the randomize once more.
11.Edit/ copy merged.
Open up animation shop,
paste as a new animation.
Go back to psp close flame layer 1 and open flame layer 2.
Edit/ copy merged.
Back to animation shop,
paste after current frame.
Go back to psp, close the layer you are on.
Open and activate the next layer down.
Edit/ copy merged.
Back to animation shop,
paste after current animation.
Go back to psp, close the layer you are on.
Open and activate the next layer down.
Edit/ copy merged.
Back to animation shop,
paste after current animation.
View/ animation then file/save as.
12.Create your name in paintshop as normal, copy the file and paste as a new animation into animation shop.
Copy the name in animation shop, activate your animation, edit/ select all, edit/ paste into selected frame and then file/save as.
Saturday 4 December 2010

Tutorial written by and © to Bits N Bobs 4th December 2010.
Results are for personal use only.
No monetry gain allowed and that includes placing them behind a paid or donation based membership area.
You are not allowed to share/forward or translate any of my tutorials or place them on any blog, website, DVD or anywhere else without my permission.
These tutorials are written from my own ideas and any similarities to any other tutorial is purely coincidental.
All tutorials are for those with a working knowledge of paintshop pro.
I reserve the right to amend these terms at any time.
Supplies needed.
Font of choice for your name and text.
I am using Agatha Regular
Tube of choice.
I am using Gaga by Elias Chatzoudis
Tubes are not to be used without an MPT
Mask of choice.
I am using Vix_Mask363 which you can download here
Scrap kit Crime Scene by Bits N Bobs
Scraps I am using from this kit are
Paper 10, Elements 5, 11, 18 and 41
Note
This tutorial was written in PSP 9
Open all supplies in paintshop except the font.
Double click on your font and minimize.
1.Re-size your paper to 600 pixels wide,
Layers/ promote background layer,
Layers/ New mask layer/ from image,
Find your mask image,
Source luminance tabbed, Invert mask data untabbed.
Ok.
Layers/ merge group, Layers/ duplicate layer, Merge/ Merge visible.
2.Copy Element 18, paste onto your image as a new layer,
Copy your tube, paste onto your image as a new layer,
Position to your liking.
3.Activate your frame layer,
Selections/ select all/ float/ defloat,
Activate your tube layer.
Using your eraser rub away the bottom of your tube over the bottom part of the frame.
We want her to look like she is popping out of the frame.
Selections/ select none.
Rub away the remaining bottom of your tube,
Activate your frame layer,
Add a drop shadow of choice.
I am using V3, H3, O100, B9, #000000
Now activate your tube layer and add the same drop shadow.
4.Copy element 5, paste as a new layer.
We only want the top part of this element so erase the bottom part.
Position to your liking towards the bottom of your frame.
Use your raster deform tool to align the sides with your frame.
Add a drop shadow of choice.
5.Re-size Element 11 to 200 pixels wide,
Copy, paste onto your image as a new layer,
position to your liking and add a drop shadow of choice.
6.Re-size Element 41 to 300 pixels high,
Copy, paste onto your image as a new layer,
position to your liking.
Duplicate layer, image/ mirror.
Duplicate layer, image/ flip, layers/ merge/ merge down
Layers/ arrange/ send to bottom
and add a drop shadow of choice.
7. Layers/ merge/ merge visible.
Add all copyright info, name and save.
Friday 3 December 2010

Click here to view animation
Ho Ho Ho
Tutorial written by and © to Bits N Bobs 3rd December 2010.
Results are for personal use only.
No monetry gain allowed and that includes placing them behind a paid or donation based membership area.
You are not allowed to share/forward or translate any of my tutorials or place them on any blog, website, DVD or anywhere else without my permission.
These tutorials are written from my own ideas and any similarities to any other tutorial is purely coincidental.
All tutorials are for those with a working knowledge of paintshop pro.
I reserve the right to amend these terms at any time.
Supplies needed.
Font of choice for your name and text.
I am using Agatha Regular
Tube of choice.
I am using Dressed for Santa from MyTubedArt
Tubes are not to be used without an MTA license
Mask of choice.
I am using Vix_Mask435 which you can download here
Scrap kit Ho Ho Ho by Bits N Bobs
Scraps I am using from this kit are
Paper 9, Elements 31, 33, 17 and 9
Plug ins used
AAA Photo frame
Penta.com / Dots and cross - Garbage collection
Eye Candy 5 nature / Fire ( only needed for the animation )
Note
This tutorial was written in PSP 9
Open all supplies in paintshop except the font.
Double click on your font and minimize.
1.Re-size your paper to 300 pixels wide,
Layers/ promote background layer,
Layers/ New mask layer/ from image,
Find your mask image,
Source luminance tabbed, Invert mask data untabbed.
Ok.
Layers/ merge group, Layers/ duplicate layer, Merge/ Merge visible.
2.Re-size Element 17 to 200 pixels wide
Copy, paste onto your image as a new layer,
Add a drop shadow of choice.
I am using V3, H3, O100, B9, #000000
3.Re-size Element 31 to 350 pixels high,
Copy, paste onto your image as a new layer,
Position to your liking.
Add a drop shadow of choice.
4.Re-size Element 33 to 400 pixels wide,
Copy, paste onto your image as a new layer,
Add a drop shadow of choice.
5.Re-size Element 9 to 250 pixels high
Copy, paste onto your image as a new layer,
Add a drop shadow of choice.
6.Re-size your tube to 400 pixels high,
copy and paste as a new layer.
Position to your liking.
Add a drop shadow of choice.
7.Add all copyright info.
8.Activate your candle layer.
Using your freehand selection tool and the following settings
draw a flame shape something similar to the image below.
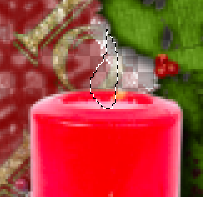
Layers/new raster layer, name it flame 1, flood fill with a flame colour of your choosing.
I am using #f3c045.
9.Crop tool, merged opaque ( image below ) then crop
10.Layers/ new raster layer,
flood fill with a colour of choice,
I am using #5e8b17.
Layers/ arrange/ send to bottom.
Effects/ 3D effects/ Penta.com/ Dot and cross
Amount: 72, Distance: 10, Width: 2
11.Effects/ 3D effects/ AAA foto frame settings as below.

Repeat effect but change the width to 20
PLEASE NOTE: Save your tag now if you do not wish continue with the animation
12.Duplicate your flame layer and re name it flame 2,
duplicate flame 2 layer and re name it flame 3.
Close flame 2 and flame 3 layers and activate flame 1 layer.
Effects/ 3D plugins/ Eye Candy 5 Nature/ Fire
Settings to your liking or mine as below

Open and activate flame 2 layer
Effects/ 3D plugins/ Eye Candy 5 Nature/ Fire
Same settings as before but hit random seed once.
Open and activate flame 3 layer
Effects/ 3D plugins/ Eye Candy 5 Nature/ Fire
Same settings as before but hit random seed once.
Selections/ select none.
13.Close frame layers 2 and 3.
Edit/ copy merged.
Open up animation shop,
paste as a new animation.
Go back to psp close flame layer 1 and open flame layer 2.
Edit/ copy merged.
Back to animation shop,
paste after current frame.
Go back to psp, close flame layer 2 and open flmae layer 3.
Back to animation shop,
paste after current animation.
View/ animation then file/save as.
14.Create your name in paintshop as normal, copy the file and paste as a new animation into animation shop.
Copy the name in animation shop, activate your animation, edit/ select all, edit/ paste into selected frame and then file/save as.
Subscribe to:
Posts
(Atom)
Stores


BNB Blinkie


