

Tuesday 13 August 2013

Tutorial written by and © to Bits N Bobs 13th August 2013.
Results are for personal use only.
No monetry gain allowed and that includes placing them behind a paid or donation based membership area.
You are not allowed to share/forward or translate any of my tutorials or place them on any blog, website, DVD or anywhere else without my permission.
These tutorials are written from my own ideas and any similarities to any other tutorial is purely coincidental.
All tutorials are for those with a working knowledge of paintshop pro.
I reserve the right to amend these terms at any time.
Supplies needed.
Font of choice for your name.
I am using AR Julian.
Tube of choice.
I am using Popsicle by Carlos Diez available at UpYourArt
Tube is not to be used without the correct licence.
Mask of choice.
I am using Geometric Grungeframe1 by Essex Girl
You can download this mask here
Scrap kit of choice
I am using Babe-a-licious by Bits N Bobs
Items from this kit I am using are...
Papers 3 and 9, Elements Sparkles 1, Leaf branch, Gem string 2, Fastener 2,
Bling ribbon 2, Flowers 1, 2 and 3, Ric rac 2, butterfly 3.
Note
This tutorial was written in PSP 9.
Double click on your font and minimize.
Open all other supplies in paintshop.
1. Open a new image 600 x 600, transparent at 72 dpi.
Edit/ Select all.
Copy paper 3, paste into selection.
Selections/ Select none.
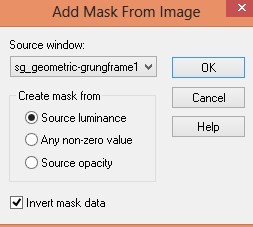
Layers/ new mask layer/ from image.
Scroll to your mask image.
Source luminance and invert mask data tabbed.
Layers/ Merge/ Merge group.
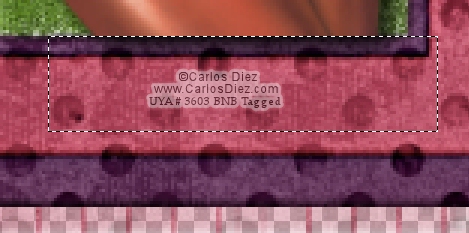
2. Copy your frame 6, paste as a new layer.
Image/ re-size to 500 pixels high all layers un-tabbed
Position over the right rectangle of the mask.
With your magic wand select the center of your frame.
Selections/ modify/ expand by 3.
Layers/ new raster layer,
Copy paper 9, paste into selection.
Selections/ select none.
Layers/ arrange/ move down.
3. Copy your sparkles.
Paste as a new layer.
Image/ re-size to 500 pixels high all layers un-tabbed
Position to the top left.
Layers/ duplicate, Image/ mirror, Image/ flip.
Layers/ merge/ merge down.
Use your eraser to remove the sparkles from the
center of your frame.
Add a drop shadow of choice.
I am using...
V 3, H 3, O 50, B 3, Colour #000000
4. Copy your leaf branch.
Paste as a new layer.
Image/ re-size to 500 pixels high all layers un-tabbed
Position to the top left corner of your frame.
Layers/ duplicate, Image/ mirror,
position slightly to the right so your leaves
are just poking out.
Layers/ merge/ merge down.
Add a drop shadow of choice.
Use your eraser to remove the branch from the
center of your frame.
5. Activate your top layer.
Copy your tube, paste as a new layer.
Image/ re-size to 450 pixels high all layers un-tabbed
Position your tube so it looks like she is popping
out of your frame.
Add a drop shadow of choice.
I am using...
V 4, H 4, O 80, B 9, Colour #000000
Using your rectangle selection tool select the
drop where your tubes legs meet the bottom of the frame.
Hit delete on your keyboard.
6. Copy your gem string, paste as a new layer.
Image/ re-size to 300 pixels high all layers un-tabbed.
Add a drop shadow of choice.
I am using...
V 3, H 3, O 50, B 3, Colour #000000
Position to the right hand side.
Copy your fastener, paste as a new layer.
Image/ re-size to 200 pixels high all layers un-tabbed.
Position at the top of your gem string.
Use your deform tool to rotate it slightly to the right.
Add a drop shadow.
7. Copy your bling ribbon, paste as a new layer.
Image/ re-size to 230 pixels wide all layers un-tabbed.
Add a drop shadow and position at the bottom of your frame.
Layers/ arrange/ move down,
repeat until it is below your frame layer.
8. Activate your frame layer.
Copy your flower 3, paste as a new layer.
Image/ re-size to 300 pixels wide all layers un-tabbed.
Position to your liking on the left hand side.
Add a drop shadow.
Copy your flower 2, paste as a new layer.
Position below your flower 3.
Add a drop shadow.
Image/ re-size to 250 pixels wide all layers un-tabbed.
Copy your flower 1, paste as a new layer.
Image/ re-size to 200 pixels wide all layers un-tabbed.
Position between your flower 2 and 3.
Position below your flower 3
Add a drop shadow.
9. Activate your top layer.
Copy your ric rac, paste as a new layer.
Image/ rotate/ free rotate, 90 left,
all layers un-tabbed.
Image/ re-size to 350 pixels high all layers un-tabbed.
Position on the left hand side.
Add a drop shadow.
Using your raster deform tool rotate the ric rac
so it follows the same line as the masked frame.
Layers/ arrange/ move down, repeat until it is
above your masked layer.
10. Activate your top layer.
Copy your butterfly, paste as a new layer.
Image/ re-size to 200 pixels high all layers un-tabbed.
Position on your branch on the left hand side.
Add a drop shadow.
11. Layers/ new raster layer.
Add any text you want.
Add your copy right info and name.
Layers/ merge / merge visible and save.
I use file export as transparent png.
Friday 2 August 2013

Yoanna Fantasy
Tutorial written by and © to Bits N Bobs 2nd August 2013.
Results are for personal use only.
No monetry gain allowed and that includes placing them behind a paid or donation based membership area.
You are not allowed to share/forward or translate any of my tutorials or place them on any blog, website, DVD or anywhere else without my permission.
These tutorials are written from my own ideas and any similarities to any other tutorial is purely coincidental.
All tutorials are for those with a working knowledge of paintshop pro.
I reserve the right to amend these terms at any time.
Supplies needed.
Font of choice for your name.
I am using Reisling.
Tube of choice.
I am using Yoanna by Zlata M available at Picsfordesign
Tube is not to be used without the correct licence.
Plugins - None needed
Mask of choice.
I am using Daisy Edge by Essex Girl
Scrap kit of choice
I am using Fantasia by Bits N Bobs
Items from this kit I am using are...
Paper 4, Frame 1, Elements Bubble 1, Dove 2, string ribbon 4, Flower gems 1,2 and 3,
Note
This tutorial was written in PSP 9.
Double click on your font and minimize.
Open all other supplies in paintshop.
1. Open Frame 1.
Press Shift+D on your keyboard and close
the original frame.
Image/ Canvas size 600 x 600, placement center.

2. Copy your paper.
On your working image, layer/ new raster layer.
Selections/ select all, paste into selection.
Selections/ select none.
Layers/ arrange/ move down.
Layers/ New mask layer/ from image.
Look for your mask, source luminance tabbed
all else un-tabbed and press ok.
Layers/ merge/ merge group

3. Copy Bubbles 1, paste as a new layer.
Image/ re-size to 400 pixels high.
Position towards the top left corner.
Layers/ duplicate, Image/ mirror, Image/ flip.
Layers/ merge/ merge down.
4. Activate your top layer.
Copy string ribbon 4, paste as a new layer.
Image/ flip.
Image/ re-size to 400 pixels wide.
Position towards the top right corner.
Add a drop shadow of choice.
I have used...
V 3, H 3, O 60, B 5, C #000000
5. Copy and paste flower gem 1 as a new layer.
Image/ re-size to 400 pixels wide.
Position to your liking.
Copy and paste flower gem 2 as a new layer.
Image/ re-size to 400 pixels wide.
Position to your liking.
Copy and paste flower gem 3 as a new layer.
Image/ re-size to 400 pixels wide.
Position to your liking.
There is no right or wrong place for them.
Add a drop shadow of choice to all
3 flower gems.
I have used the same settings.
6. Activate your frame layer.
Copy your tube, paste as a new layer.
Image/ re-size to 400 pixels wide.
Position so her face is within the frame.
Activate your frame layer.
Using your freehand selection tool (lassoo) set at
point to point select the center of the frame.

Selections modify, expand by 3.
Selections/ invert, activate your tube layer
and hit delete on your keyboard.
Layers/ new raster layer.
Selections/ select all,
Crop tool, snap crop rectangle to selection
and apply.
This removes the rest of the tube that you can't see.

Activate your tube layer.
Layers/ arrange/ move down.
7. Activate your top layer.
Dove 2, copy and paste as a new layer
onto your working image.
Position onto the right hand corner
of the frame.
Add a drop shadow of choice.
I have used the same settings.
8. Copy your original tube again.
Paste as a new layer.
Image/ re-size to 350 pixels high.
Image/ mirror.
Position to the left side.
Add a drop shadow of choice.
I have used...
V 3, H 3, O 100, B 11, C #000000
9. Activate your frame layer.
Add a drop shadow of choice.
I have used...
V 3, H 3, O 60, B 11, C #000000
10. Layers/ new raster layer.
Add any text you want.
Add your copy right info and name.
Layers/ merge / merge visible and save.
I use file export as transparent png.
Thursday 1 August 2013

Perla at the beach
Tutorial written by and © to Bits N Bobs 2nd August 2013.
Results are for personal use only.
No monetry gain allowed and that includes placing them behind a paid or donation based membership area.
You are not allowed to share/forward or translate any of my tutorials or place them on any blog, website, DVD or anywhere else without my permission.
These tutorials are written from my own ideas and any similarities to any other tutorial is purely coincidental.
All tutorials are for those with a working knowledge of paintshop pro.
I reserve the right to amend these terms at any time.
Supplies needed.
Font of choice for your name.
I am using Wedding Script
Tube of choice.
I am using Perla by Alex Prihodko available at Picsfordesign
Tube is not to be used without the correct licence.
Plugin
Penta.com dots and cross. Garbage collection filter
Mask of choice.
I am using sinedots fish by Essex Girl
Scrap kit of choice
I am using At the beach by Bits N Bobs
Items from this kit I am using are...
Papers 3 and 6, Elements 2, 41, 51, 52, 57 and 71
Note
This tutorial was written in PSP 9.
Double click on your font and minimize.
Open all other supplies in paintshop.
1. Open a new image 600 x 600 at 72 dpi.
Copy paper 3, paste as a new layer.
Layers/ new raster layer.
Selections/ select all, paste into selection.
Selections/ select none.
Layers/ New mask layer/ from image.
Look for your mask, source luminance tabbed
invert mask tabbed,
all else un-tabbed and press ok.
Layers/ merge/ merge group
Layers/ duplicate,
Layers/ merge/ merge down.
Image/ resize to 550 pixels wide,
all layers un-tabbed.

2. Copy paper 6 and paste as a new layer.
Image/ resize to 400 pixels wide,
all layers un-tabbed.
Effects/ plug ins/ penta.com/ Dots and cross.
176, 10, 2

3. Copy ATB57 paste as a new layer.
Use your magic wand tool to select the
center of each frame hole, not forgetting
the blank section in between the strings.
Selections/ modify/ expand by 5.
Selections/ invert.
Activate paper 6 layer.
Hit delete on your keyboard.
Selections, select none.
4. Copy element 51, paste as a new layer.
Image/ resize to 500 pixels high all layers un-tabbed.
Position to the left hand side.
Layers/ duplicate, Image/ Mirror,
Image/ flip.
5. Activate the top layer.
Copy element 52, paste as a new layer.
Image/ resize 350 pixels wide all layers un-tabbed.
Position in the top left part of the frame.
Layers/ arrange/ move down.
Layers/ duplicate, Image/ Mirror,
Image/ flip, Layers/ merge/ merge down.
6. Activate the top layer.
Copy element 41, paste as a new layer.
Resize to 400 pixels high all layers un-tabbed.
Copy element 2, paste as a new layer.
Resize to 250 pixels high all layers un-tabbed.
Position onto to bottom right corner
of your frame.
7. Copy your tube, paste as a new layer.
Resize to 200 pixels wide all layers un-tabbed.
Position to your liking.
Copy element 71, paste as a new layer.
Resize to 200 pixels wide all layers un-tabbed.
Position to your liking.
8. Add a drop shadow of choice to the layers of your choosing.
I am using
V 3, H 3, O 80, B 9, C #000000
On the following layers.
Tube, ball, frame, chair and boat.
9. Layers/ new raster layer.
Add any text you want.
Add your copy right info and name.
Layers/ merge / merge visible and save.
I use file export as transparent png.

Rock Star Heidi
Tutorial written by and © to Bits N Bobs 1st August 2013.
Results are for personal use only.
No monetry gain allowed and that includes placing them behind a paid or donation based membership area.
You are not allowed to share/forward or translate any of my tutorials or place them on any blog, website, DVD or anywhere else without my permission.
These tutorials are written from my own ideas and any similarities to any other tutorial is purely coincidental.
All tutorials are for those with a working knowledge of paintshop pro.
I reserve the right to amend these terms at any time.
Supplies needed.
Font of choice for your name.
I am using SlayTanic.
Tube of choice.
I am using Heidi by Bits N Bobs available at MyTubedArt
Tube is not to be used without the correct licence.
Plugins - None needed
Mask of choice.
I am using Star fade border by Essex Girl
Scrap kit of choice
I am using FTU Rock Star by Kittz Kreationz
Items from this kit I am using are...
RSP4, RS15, RS21, RS24, RS37, RS54,
Note
This tutorial was written in PSP 9.
Double click on your font and minimize.
Open all other supplies in paintshop.
1. Re-size P4 to 600 x 600 at 72 dpi.
Press Shift+D on your keyboard and close
the original P4 DO NOT SAVE.
2. Layers/ New mask layer/ from image.
Look for your mask, source luminance tabbed
all else un-tabbed and press ok.
Layers/ merge/ merge group

3. Open RS15, copy and paste as a new layer
onto your working image.
Image/ resize to 400 pixels high all layers un-tabbed.
Position towards the bottom right corner.
4. Copy your tube, paste as a new layer.
Image/ resize to 300 pixels high all layers un-tabbed.
Position to the left hand side.
Add a drop shadow of choice.
I have used...
V 3, H 3, O 100, B 5, C #000000
5. Copy RS21, paste as a new layer.
Position just below your tubes shoulder
Layers/ arrange/ move down.
Layers/ duplicate, Image/ mirror.
Position to the left hand side.
Layers/ merge/ merge down.
Add a drop shadow of choice.
I have used the same settings as before.

6. Copy RS37, paste as a new layer.
Image/ resize to 400 pixels wide.
Add a drop shadow of choice.
I have used the same settings as before
but change the opacity to 60%.
7. Copy RS54, paste as a new layer.
Image/ resize to 300 pixels high.
Position towards the top right corner.
I have used...
V 3, H 3, O 100, B 5, C #000000
8. Activate your tube layer.
Copy RS24, paste as a new layer.
Position in the bottom left corner
so the tubes legs are covered.
Add a drop shadow of choice.
I have used the same settings as before.
9. Layers/ new raster layer.
Add any text you want.
Add your copy right info and name.
Layers/ merge / merge visible and save.
I use file export as transparent png.
Subscribe to:
Posts
(Atom)
Stores


BNB Blinkie


