

Thursday 9 April 2015

Steampunked
Tutorial written by and © to Bits N Bobs 9th April 2015
Results are for personal use only.
No monetry gain allowed and that includes placing them behind a paid or donation based membership area.
You are not allowed to share/forward or translate any of my tutorials or place them on any blog, website,
DVD or anywhere else without my permission.
You are welcome though to add a link to my tutorial page.
These tutorials are written from my own ideas and any similarities to any other tutorial is purely coincidental.
All tutorials are for those with a working knowledge of paintshop pro.
I reserve the right to amend these terms at any time.
Supplies needed.
Font of choice for your name.
I am using 2 fairytale fancy dna.
Tube of choice.
I am using the tube Steampunk girl by Amberly Berendson
Tube is not to be used without the correct licence.
Steampunk corner Animation by Cat here (if you want to animate)
Mask of choice.
I am using Vix_Mask362 available here
Scrap kit Operation Steampunk available here or here
Items I have used are....
Paper 5, 9,
Elements 16, 38, 39, 62, 71, 73,
Note
This tutorial was written in PSP 9.
Double click on your font and minimize.
Open all other supplies in paintshop.
1. Open a new image, 600 w x 600 h at 72 dpi.
Selections/ select all.
Copy your paper, paste into selection.
Layers/ new mask layer/ from image.
Look for your mask, source luminance checked
all else unchecked.
Click ok.
Selections/ none.
Layers/ merge/ merge group

2. Copy your frame, paste as a new layer.
Image/re-size to 450 pixels wide.
Using your magic wand select the center of
one of the frames.
Hold down your shift button and select the center
of the other two frames.
Release your shift button.
Selections/ modify/ expand by 3.
Layers/ new raster layer.
Copy paper 5, paste into selection.
Layers/ arrange/ move down.
Selections/ select none.
3. Copy element 38, paste as a new layer.
Image/ re-size to 300 pixels wide,
all layers un-tabbed.
Position to your liking.
Mine is top left.
Layers/ duplicate layer.
Position to your liking.
Mine is bottom right.
Layers/ merge/ merge down
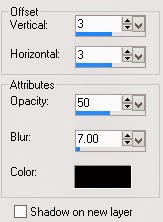
Add a drop shadow of choice.
For this tutorial I am using...
V3, H3, O70, B7, C#000000
Layers/ arrange/ move down.

4. Copy element 39.
Activate top layer, paste as a new layer.
Image/ re-size to 400 pixels wide,
all layers un-tabbed.
Position to your liking.
Mine is in the top frame.
Add a drop shadow of choice.
5. Copy element 71, paste as a new layer.
Image/ re-size to 300 pixels wide,
all layers un-tabbed.
Position to your liking.
Mine is towards the top.
Add a drop shadow of choice.
Layers/ arrange/ move down, edit/repeat x 2,
It should be below the frame paper
6. Copy element 62, paste as a new layer.
Image/ re-size to 300 pixels wide,
all layers un-tabbed.
Image/ mirror.
Position to your liking.
Mine is top right corner.
Add a drop shadow of choice.
Layers/ arrange/ send to bottom
7. Copy your tube,
activate top layer, paste as a new layer.
Image/ re-size to 500 pixels high,
all layers un-tabbed.
Image/ mirror.
Position to your liking.
Mine is bottom left corner.
Add a drop shadow of choice.
8. Copy element 16, paste as a new layer.
Image/ re-size to 150 pixels wide,
all layers un-tabbed.
Position to your liking and layer duplicate for more.
I have three, one on each frame.
Add a drop shadow of choice to each one.
Note: If you do not wish to animate then add your name, copyright
info and file export as a transparent png and save.
Animation
9. Add your copyright information.
Layers/ merge/ merge visible.
Edit/ Copy.
Open animation shop.
Edit/ paste as a new animation.
Edit/ paste after current frame.
Repeat until you have six frames.
10. Open your mng animation file.
Edit/ select all,
Animation/ resize animation.
Re-size to 50% smart size.

Edit/ copy.
Activate your tag.
Edit/ select all, edit/propogate paste, edit/ paste into selected frames.
Before you release your mouse button move the animation
so it is inside the bottom frame.
11. Create your name in paintshop as normal, copy the file
and paste as a new animation into animation shop.
Edit/ copy your name in animation shop, activate your tag,
Edit/ select all, edit/propogate paste, edit/ paste into selected frames
and then file/save as.
Below are the settings I use for a transparent gif.
12. When your animation window pops up click on customize.
Colours, 255 colours, Tab Optimize Octree and Error diffusion

Click on the Partial transparency tab,
Convert pixels less than 13%,
Yes blend with colour # FFFFFF (white), ok

Then just keep clicking next to save.
Thursday 19 March 2015


Tutorial written by and © to Bits N Bobs 19th March 2015.
Results are for personal use only.
No monetry gain allowed and that includes placing them behind a paid or donation based membership area.
You are not allowed to share/forward or translate any of my tutorials or place them on any blog, website, DVD or anywhere else without my permission.
These tutorials are written from my own ideas and any similarities to any other tutorial is purely coincidental.
All tutorials are for those with a working knowledge of paintshop pro.
I reserve the right to amend these terms at any time.
Supplies needed.
Font of choice for your name.
I am using Roundy
Tube of choice.
You will need one that contains a background
and one floral.
I am using two by Italia Ruotolo
Mine are Pink on pink and Pink study.
Both are available at MyTubedArt
These tubes are not to be used without the correct licence.
Animation of choice.
I am using SimoneAni125 available at Scrappybitoffun
Plugins needed.
I.C.NET FiltersUnlimited 2
Note
This tutorial was written in PSP 9.
Double click on your font and minimize.
Install your plugin.
Open a new image, 600 w x 250 h at 72 dpi.
1. Flood fill with a colour from your tube.
I have used #c16492
Copy the background layer of the tube.
Paste as a new layer.
Effects/ plugins/ ICNet software/ filters unlimited 2/
Distortion filters/ warp jump.
Intensity 200.
Image/ rotate/ free rotate / right, 90, rotate single layer tabbed.
Position to your liking.
I have mine so what's left of her face is at the top.
2. Layers/ merge down.
Edit/ copy.
Now we move over to animation shop.
Edit/ paste as a new animation.
Edit/ paste after current frame.
Repeat until you have 5 frames.
Edit/ select all.
Open your animation.
Edit/ select all, Edit/copy
Activate your tag,
Edit/ paste into selected frames.
Before you press anything move your animation to the right hand side.
If you don't like where it landed just undo and paste again
3. Go back over to paint shop.
Close the merged layer.
Copy your tube.
Paste as a new layer.
Position to the left.
Add a drop shadow of choice.
I have used...
O3, H3, O100, B13, Colour #000000

4. Copy your rose tube.
Paste as a new layer.
Image/ re-size to 420 pixels wide.
Image/ mirror, position to the right bottom corner.
Add a drop shadow of choice.
Layers/ arrange/ move down.
Activate top layer.
Layers/ new raster layer.
Add your text and copyright info.
Edit/ copy merged
Head back over to animation shop.
5. Edit/ paste as a new animation.
Edit/ paste after current frame.
Repeat until you have 5 frames.
Edit/ select all/ edit copy.
Activate your merged tag frames you animated earlier.
Edit/ select all.
Scroll in a little so you can see where you are going to paste.
Edit/ paste into selected frames.
Before you press anything move your image so it lines up correctly.
If you don't like where it landed just undo and paste again
File, Save as.
6. For your avatar crop your animation down to as close to 180 x 180 as you can.
Create your Initial in paintshop as normal, copy the file
and paste as a new animation into animation shop.
Copy the Initial in animation shop, activate your AV,
Edit/ select all, edit/ paste into selected frame and then file/save as.
Wednesday 18 March 2015

Tutorial written by and © to Bits N Bobs 18th March 2015
Results are for personal use only.
No monetry gain allowed and that includes placing them behind a paid or donation based membership area.
You are not allowed to share/forward or translate any of my tutorials or place them on any blog, website,
DVD or anywhere else without my permission.
You are welcome though to add a link to my tutorial page.
These tutorials are written from my own ideas and any similarities to any other tutorial is purely coincidental.
All tutorials are for those with a working knowledge of paintshop pro.
I reserve the right to amend these terms at any time.
IM Stat - IM Tut
Supplies needed.
Font of choice for your name.
I am using Grinched.
Tube of choice.
I am using items from the kit
Mask of choice.
I am using Vix_Mask363 available here
Kit used is a FTU called Mad as a hatter by Kittz
Items I have used are....
Paper 4 and 7
Elements 8, 14, 15, 31, 38, 49, 52,
Plugins
None required
Note
This tutorial was written in PSP 9.
Double click on your font and minimize.
Open all other supplies in paintshop.
1. Open a new image, 600 w x 600 h at 72 dpi.
Selections/ select all.
Copy your paper 4, paste into selection.
Layers/ new mask layer/ from image.
Look for your mask, source luminance checked
all else unchecked.
Click ok.
Selections/ none.
Layers/ merge/ merge group

2. Copy your frame , element 15
paste as a new layer.
Image/re-size to 350 pixels wide,
all layers un-tabbed.
Select the center of the frame.
Selections/ modify/ expand by 3.
Layers/ new raster layer,
flood fill with white #ffffff.
Layers/ arrange/ move down.
Layers/ new raster layer.
Copy paper 4 and paste into selection.
Lower layer opacity to 40.
Copy whichever image or tube you want in the frame.
I have chosen element 49.
Paste as a new layer.
Selections/ invert, hit delete on your keyboard.
Selections/ select none.
Add a drop shadow of choice.
Activate your frame layer and add the same drop shadow.
For this tutorial I am using...
V3, H3, O80, B7, C#000000

3. Copy element 52
paste as a new layer.
Image/ re-size to 350 pixels wide,
all layers un-tabbed.
Layers/ arrange/ move down
Add a drop shadow of choice.
4. Copy element 8,
activate your top layer, paste as a new layer.
Image/ re-size to 350 pixels wide,
all layers un-tabbed.
Position to your liking.
Mine is positioned so the krazey lines up with the top center
of the frame.
Selections/ select all, Selections/ float,
Selections/modify, Selections/ expand by 2.
Layers/ new raster layer, flood fill with white, #ffffff
Layers/ arrange/ move down.
Selections/ select none.
Add a drop shadow of choice.
5. Copy element 14, paste as a new layer.
Image/ re-size to 250 pixels wide,
all layers un-tabbed.
Position to your liking.
Mine is bottom left corner.
Add a drop shadow of choice.
Copy element 31, paste as a new layer.
Image/ re-size to 300 pixels wide,
all layers un-tabbed.
Position to your liking.
Mine is at the bottom of the cup (element 14).
Add a drop shadow of choice.
6. Copy element 38, paste as a new layer.
Image/ re-size to 300 pixels wide,
all layers un-tabbed.
Position to your liking.
Mine is bottom right corner.
Add a drop shadow of choice.
7. Add any text you want.
Add your copy right info and name.
File/ export/ save as a png transparent bg or jpg if you want a white background.
8. For a forum set arrange the elements to your liking.
Edit/ copy merged.
Open a new image 600w x 250h
Edit/ paste as a new layer.
Position to your liking.
Add your copyright info, Name and then save.
9. For your avatar open a new image,
180 x 180 at 72 dpi.
Re-arrange your elements on your tag to your liking.
Edit/Copy merged , paste as a new layer.
Add your copyright info, initial and then save.
Tuesday 17 March 2015

Spring has sprung
Tutorial written by and © to Bits N Bobs 17th March 2015
Results are for personal use only.
No monetry gain allowed and that includes placing them behind a paid or donation based membership area.
You are not allowed to share/forward or translate any of my tutorials or place them on any blog, website,
DVD or anywhere else without my permission.
You are welcome though to add a link to my tutorial page.
These tutorials are written from my own ideas and any similarities to any other tutorial is purely coincidental.
All tutorials are for those with a working knowledge of paintshop pro.
I reserve the right to amend these terms at any time.
IM Stat - IM Tut
Supplies needed.
Font of choice for your name.
I am using Miss Smarty Pants.
Mask of choice.
I am using Vix_Mask363 available here
Kit used is Think Spring by Bits N Bobs
Items I have used are....
Paper 12
Elements 10, 25, 35, 43, 68,
Plugins
None required
Note
This tutorial was written in PSP 9.
Double click on your font and minimize.
Open all other supplies in paintshop.
1. Open a new image, 600 w x 600 h at 72 dpi.
Selections/ select all.
Copy your paper, paste into selection.
Layers/ new mask layer/ from image.
Look for your mask, source luminance checked
all else unchecked.
Click ok.
Selections/ none.
Layers/ merge/ merge group

2. Copy your frame , element 68
paste as a new layer.
Image/re-size to 350 pixels wide.
Position to your liking.
Mine is to the bottom left corner slightly.
3. Copy element 43
paste as a new layer.
Image/ re-size to 400 pixels wide,
all layers un-tabbed.
Position to your liking.
Mine is bottom left corner.
Layers/ duplicate, Image/ mirror
Position to your liking.
Mine is top right corner.
Layers/ merge/ merge down
Layers/ arrange/ move down
Erase any part showing on the inside of your frame.
Add a drop shadow of choice.
For this tutorial I am using...
V3, H3, O50, B7, C#000000
4. Copy element 35, activate your top layer
paste as a new layer.
Image/ re-size to 450 pixels wide,
all layers un-tabbed.
Position to your liking.
Mine is bottom right corner.
Add a drop shadow of choice.
5. Copy element 25,
activate your bottom layer, paste as a new layer.
Image/ re-size to 350 pixels wide,
all layers un-tabbed.
Position to your liking.
Mine is top left corner.
Add a dropshadow of choice.
Erase any part showing on the inside of your frame.
6. Copy element 10, activate top layer,
paste as a new layer.
Image/ re-size to 350 pixels wide,
all layers un-tabbed.
Position to your liking.
Mine is bottom middle.
Add a drop shadow of choice.
7. Add any text you want.
Add your copy right info and name.
File/ export/ save as a png transparent bg or jpg if you want a white background.
8. For a forum set arrange the elements to your liking.
Edit/ copy merged.
Open a new image 600w x 250h
Edit/ paste as a new layer.
Position to your liking.
Add your copyright info, Name and then save.
9. For your avatar open a new image,
180 x 180 at 72 dpi.
Re-arrange your elements on your tag to your liking.
Edit/Copy merged , paste as a new layer.
Add your copyright info, initial and then save.
Sunday 15 March 2015

Easter Treats
Tutorial written by and © to Bits N Bobs 15th March 2015
Results are for personal use only.
No monetry gain allowed and that includes placing them behind a paid or donation based membership area.
You are not allowed to share/forward or translate any of my tutorials or place them on any blog, website,
DVD or anywhere else without my permission.
You are welcome though to add a link to my tutorial page.
These tutorials are written from my own ideas and any similarities to any other tutorial is purely coincidental.
All tutorials are for those with a working knowledge of paintshop pro.
I reserve the right to amend these terms at any time.
Supplies needed.
Font of choice for your name.
I am using Daddys Girl
Tube of choice.
I am using the tube Bunnella by Bits N Bobs
Tube is not to be used without the correct licence.
Easter Treats Add On freebie by Bits N Bobs
Mask of choice.
I am using Vix_Mask431 available here
Items I have used are....
Paper 2
Elements 2, 3, 4, 8, 9, 13, 15,
Plugins
None required
Note
This tutorial was written in PSP 9.
Double click on your font and minimize.
Open all other supplies in paintshop.
1. Open a new image, 600 w x 600 h at 72 dpi.
Selections/ select all.
Copy your paper, paste into selection.
Layers/ new mask layer/ from image.
Look for your mask, source luminance checked
all else unchecked.
Click ok.
Selections/ none.
Layers/ merge/ merge group

2. Copy your frame , element 15
paste as a new layer.
Image/re-size to 350 pixels wide.
3. Copy element 10
paste as a new layer.
Image/ re-size to 300 pixels wide,
all layers un-tabbed.
Position to your liking.
Mine is bottom middle.
Layers/ arrange/ move down
Erase any part showing on the inside of your frame.
Add a drop shadow of choice.
For this tutorial I am using...
V3, H3, O50, B7, C#000000

4. Copy element 13,
paste as a new layer.
Image/ re-size to 300 pixels wide,
all layers un-tabbed.
Position to your liking.
Mine is bottom right.
Add a drop shadow of choice.
5. Copy element 3,
activate your bottom layer, paste as a new layer.
Image/ re-size to 400 pixels wide,
all layers un-tabbed.
Image/ flip
Position to your liking.
Mine is top right corner.
Layers/ duplicate, image/ mirror, image/ flip
Layers/ merge/ merge down
Add a drop shadow of choice.
Erase any part showing on the inside of your frame.
Adjust/ Colour Balance/ Manual colour correction,
Manual target colour tabbed,
Target: #80c6d8 Source: #c87a90

6. Copy element 4, paste as a new layer.
Image/ re-size to 400 pixels wide,
all layers un-tabbed.
Position to your liking.
Mine is top right corner.
Layers/ duplicate, image/ mirror, image/ flip
Layers/ merge/ merge down
Add a drop shadow of choice.
Erase any part showing on the inside of your frame.
7. Activate your top layer.
Copy element 8, paste as a new layer.
Image/ re-size to 200 pixels wide,
all layers un-tabbed.
Image/ mirror
Position to your liking.
Mine is bottom right corner.
Add a drop shadow of choice.
8. Copy element 9, paste as a new layer.
Image/ re-size to 200 pixels wide,
all layers un-tabbed.
Image/ mirror
Position to your liking.
Mine is bottom right corner.
Add a drop shadow of choice.
9. Copy your full body tube, paste as a new layer.
Image/ re-size to 350 pixels wide,
(this will be different if you use a different tube)
all layers un-tabbed.
Position to your liking.
Mine is on the left.
Add a drop shadow of choice.
10. Copy element 20, paste as a new layer.
Image/ re-size to 100 pixels wide,
all layers un-tabbed.
Position to your liking.
Mine is bottom left corner.
Add a dropshadow of choice.
11. Copy your tube close up.
Activate top layer.
Paste as a new layer.
Image/ mirror.
Image/ re-size to 400 pixels wide,
(this will be different if you use a different tube)
Add a drop shadow of choice.
Position to your liking.
Erase anything outside of the frame.
12. Add any text you want.
Add your copy right info and name.
File/ export/ save as a png transparent bg or jpg if you want a white background.
13. For a forum set arrange the elements to your liking.
Edit/ copy merged.
Open a new image 600w x 250h
Edit/ paste as a new layer.
Position to your liking.
Add your copyright info, Name and then save.
14. For your avatar open a new image,
180 x 180 at 72 dpi.
Re-arrange your elements on your tag to your liking.
Edit/Copy merged , paste as a new layer.
Add your copyright info, initial and then save.
Saturday 14 March 2015

KISS ME
Tutorial written by and © to Bits N Bobs 14th March 2015
Results are for personal use only.
No monetry gain allowed and that includes placing them behind a paid or donation based membership area.
You are not allowed to share/forward or translate any of my tutorials or place them on any blog, website,
DVD or anywhere else without my permission.
You are welcome though to add a link to my tutorial page.
These tutorials are written from my own ideas and any similarities to any other tutorial is purely coincidental.
All tutorials are for those with a working knowledge of paintshop pro.
I reserve the right to amend these terms at any time.
Supplies needed.
Font of choice for your name.
I am using PWComics.
Tube of choice.
I am using the tube Kiss Me by BitsNBobs
Tube is not to be used without the correct licence.
Mask of choice.
I am using Vix_Mask431 available here
Kit used is Lucky Charm add on freebie by Bits N Bobs
Items I have used are....
Paper 1
Elements 2, 11, 12, 16, 21, 26, 32,
Plugins
None required
Note
This tutorial was written in PSP 9.
Double click on your font and minimize.
Open all other supplies in paintshop.
1. Open a new image, 600 w x 600 h at 72 dpi.
Selections/ select all.
Copy your paper, paste into selection.
Layers/ new mask layer/ from image.
Look for your mask, source luminance checked
all else unchecked.
Click ok.
Selections/ none.
Layers/ merge/ merge group
2. Activate your frame
Image/re-size to 600 pixels wide.
Copy and paste as a new layer.
3. Copy element 2,
paste as a new layer.
Image/ re-size to 300 pixels wide,
all layers un-tabbed.
Position to your liking.
Mine is top right.
Using your lassoo selection erase any
part the is showing inside of the frame.
Add a dropshadow of choice.
For this tutorial I am using...
V3, H3, O70, B7, C#000000
4. Copy element 26,
paste as a new layer.
Image/ re-size to 300 pixels wide,
all layers un-tabbed.
Position to your liking.
Mine is top right over the leaves.
Layers/ duplicate, image/ mirror, image/ flip
Layers/ merge/ merge down
Add a dropshadow of choice.
5. Activate top layer.
Copy element 11,
paste as a new layer.
Image/ re-size to 300 pixels wide,
all layers un-tabbed.
Image/ mirror
Position to your liking.
Mine is bottom left corner.
Add a dropshadow of choice.
6. Copy element 16,
paste as a new layer.
Image/ re-size to 300 pixels wide,
all layers un-tabbed.
Position to your liking.
Mine is bottom right corner.
Add a dropshadow of choice.
7. Copy element 12,
paste as a new layer.
Image/ re-size to 185 pixels wide,
all layers un-tabbed.
Position to your liking.
Mine is bottom right corner.
Add a dropshadow of choice.
8. Copy element 21,
paste as a new layer.
Image/ re-size to 185 pixels wide,
all layers un-tabbed.
Position to your liking.
Mine is sitting on the top of the frame.
Add a dropshadow of choice.
9. Copy your full body tube.
Image/ re-size to 250 pixels wide,
all layers un-tabbed.
Position to your liking.
Mine is on the left hand side.
Add a dropshadow of choice.
10. On your original full body tube,
using your rectangle selection tool
select her butt section with the writing.
INSERT SS2
Copy and paste as a new layer onto your working tag.
Layers/ arrange layers/ move down,
Continue moving down until it is below the frame layer.
Position so the writing is in the diamond part of the frame.
Add a dropshadow of choice.
Erase an part outside of the diamond frame section.
11. On your original full body tube,
using your rectangle selection tool
select her head and shoulders.
INSERT SS3
Copy and paste as a new layer onto your working tag.
Image/ mirror.
Position so her face is in the square part of the frame.
Add a dropshadow of choice.
Erase an part outside of the square frame section.
12. Add any text you want.
Add your copy right info and name.
File/ export/ save as a png transparent bg or jpg if you want a white background.
13. For a forum set arrange the elements to your liking.
Edit/ copy merged.
Open a new image 600w x 250h
Edit/ paste as a new layer.
Position to your liking.
Add your copyright info, Name and then save.
14. For your avatar open a new image,
180 x 180 at 72 dpi.
Re-arrange your elements on your tag to your liking.
Edit/Copy merged , paste as a new layer.
Add your copyright info, initial and then save.
Saturday 7 March 2015


Heaven Sent
Tutorial written by and © to Bits N Bobs 7th March 2015
Results are for personal use only.
No monetry gain allowed and that includes placing them behind a paid or donation based membership area.
You are not allowed to share/forward or translate any of my tutorials or place them on any blog, website,
DVD or anywhere else without my permission.
You are welcome though to add a link to my tutorial page.
These tutorials are written from my own ideas and any similarities to any other tutorial is purely coincidental.
All tutorials are for those with a working knowledge of paintshop pro.
I reserve the right to amend these terms at any time.
Supplies needed.
Font of choice for your name.
I am using Miama.
Tube of choice.
I am using the tube from the kit by BitsNBobs
Tube is not to be used without the correct licence.
Scrap kit Heaven Sent available at Picsfordesign
Items I have used are....
Papers 15
Elements 1, 16, 36, 77, 103
Plugins
None required
Note
This tutorial was written in PSP 9.
Double click on your font and minimize.
Open all other supplies in paintshop.
1. Open a new image 600 wide X 250 high at 72 dpi
Open your paper,
Copy, paste as a new layer.
Layers/ merge/ merge visible.
2. Copy element 36, paste as a new layer.
Image/re-size 300 pixels wide all layers un-tabbed.
Add a drop shadow of choice.
I have used...
V 1, H 1, O 56, B 3, C #000000
Position to the left side.
Layers/ Duplicate layer, Image/ mirror.
Layers/ merge, merge down.
3. Copy element 5, paste as a new layer.
Layers/ Duplicate layer.
Layers/ merge, merge down.
Position towards the top left corner.
Layers/ Duplicate layer, Image/ mirror, Image/flip
Layers/ merge, merge down.
4. Copy element 16, paste as a new layer.
Position to your liking on the left.
Add a drop shadow of choice.
I have used...
V 3, H 3, O 56, B 6, C #000000
5. Copy element 77, paste as a new layer.
Layers/ arrange, move down, move down.
Add a drop shadow of choice.
I have used...
V 3, H 3, O 56, B 6, C #000000
6. Copy element 103, paste as a new layer.
Position to your liking.
Add a drop shadow of choice.
I have used...
V 3, H 3, O 56, B 6, C #000000
7. Add any text you want.
Add your copy right info and name.
File/ export/ save as a jpg.
8. For your avatar open a new image,
180 x 180 at 72 dpi.
Re-arrange your elements on your tag to your liking.
Edit/Copy merged , paste as a new layer.
Add your copyright info, initial and then save.
Subscribe to:
Posts
(Atom)
Stores


BNB Blinkie


