Search This Blog
Followers
Tut writers
If you are using any of my kits in your tutorials please email me your blinkie and link so we can add you here.
scrappingbits AT googlemail.com
Thank you
scrappingbits AT googlemail.com
Thank you
TUT TOU
You are welcome to link to my tuts :O) All tutorials are written by and © to Bits N Bobs Results are for personal use only. No monetry gain allowed and that includes placing them behind a paid or donation based membership area. Supplies are to be used for the tutorial they are supplied with and NOT to be shared. You are not allowed to share/forward or translate any of my tutorials or place them on any blog, website, CD, DVD or anywhere else without my permission. These tutorials are written from my own ideas and any similarities to any other tutorial is purely coincidental. All tutorials are for those with a working knowledge of paintshop pro. I reserve the right to amend these terms at any time.
Saturday 14 May 2011
My Milkshake
Tutorial written by and © to Bits N Bobs 14th May 2011.
Results are for personal use only.
No monetry gain allowed and that includes placing them behind a paid or donation based membership area.
You are not allowed to share/forward or translate any of my tutorials or place them on any blog, website, DVD or anywhere else without my permission.
These tutorials are written from my own ideas and any similarities to any other tutorial is purely coincidental.
All tutorials are for those with a working knowledge of paintshop pro.
I reserve the right to amend these terms at any time.
Supplies needed.
Font of choice for your name.
I am using Windsong
Tube of choice.
I am using one by DL Norton
Mine is DN0048 - Milk Maid and available at UpYourArt here
Tube is not to be used without the correct licence
Plugin - Penta.com dot and cross ( Garbage collection )
AAA Frames - Photo frame
My supplies here
Note
This tutorial was written in PSP 9.
Open all supplies in paintshop except the font and plugins.
Double click on your font and minimize.
Install your plugins.
1.Open your template and activate the square layer.
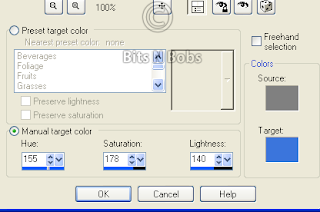
Adjust/ Colour balance/ Manual Colour Correction,
Settings as in screenshot below.
Activate the text layer, layers/ Merge/ Merge down.
Effects/ Plugins/ Penta.com/ Dots and cross
Amount: 72, Cross distance: 10, Cross width: 2

2.Copy the main tube, paste as a new layer.
Image/ mirror, position towards the left side with the top half showing,
underneath the wordart.
Add a drop shadow of choice.
I use.....
V:3, H: 3, O: 100, B: 9.00, Colour: #000000
Activate the square layer,
Selections/ select all/ float/ defloat/ invert.
Activate your tube layer and hit delete on your keyboard.
Selections/ select none.
Change the layer opacity to Soft Light,
Duplicate layer.
3.Copy the main tube, paste as a new layer.
Image/ re-size, re-size to 330 pixels high.
Position to your liking and add your drop shadow.
Close this layer and your wordart layer.
4.Activate your square layer,
Layers/ Merge/ Merge Visible.
Re-name this layer to Square.
Re-open your other 2 layers.
Copy BNB-MMS1 and paste as a new layer.
Position to your liking.
Layers/ Duplicate layer, position again to your liking.
Duplicate as many times as you like remembering to move
them to different positions.
5.Activate Layers/ merge/ merge visible.
Move the entire image so it is central on your canvas.
Layers/ Duplicate, activate the bottom layer.
Image/ Re-size, re-size this layer to 550 pixels wide.
Centralize this layer.
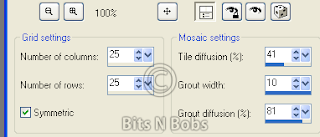
Effects/ Texture effect/ Mosaic Antique,
Settings in the screenshot below.
6.Add a new raster layer and flood fill with a colour from your image.
I am using #3b75dc
Layers/ Arrange/ Send to the bottom.
Close your top layer,
Layers/ merge/ merge visible.
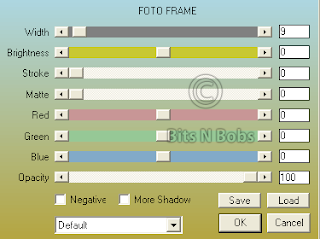
Effects/ Foto frame,
Settings in screenshot below.
7.Open up your top layer,
Add all copyright info, your name and save.
Tutorial written by and © to Bits N Bobs 14th May 2011.
Results are for personal use only.
No monetry gain allowed and that includes placing them behind a paid or donation based membership area.
You are not allowed to share/forward or translate any of my tutorials or place them on any blog, website, DVD or anywhere else without my permission.
These tutorials are written from my own ideas and any similarities to any other tutorial is purely coincidental.
All tutorials are for those with a working knowledge of paintshop pro.
I reserve the right to amend these terms at any time.
Supplies needed.
Font of choice for your name.
I am using Windsong
Tube of choice.
I am using one by DL Norton
Mine is DN0048 - Milk Maid and available at UpYourArt here
Tube is not to be used without the correct licence
Plugin - Penta.com dot and cross ( Garbage collection )
AAA Frames - Photo frame
My supplies here
Note
This tutorial was written in PSP 9.
Open all supplies in paintshop except the font and plugins.
Double click on your font and minimize.
Install your plugins.
1.Open your template and activate the square layer.
Adjust/ Colour balance/ Manual Colour Correction,
Settings as in screenshot below.
Activate the text layer, layers/ Merge/ Merge down.

Effects/ Plugins/ Penta.com/ Dots and cross
Amount: 72, Cross distance: 10, Cross width: 2

2.Copy the main tube, paste as a new layer.
Image/ mirror, position towards the left side with the top half showing,
underneath the wordart.
Add a drop shadow of choice.
I use.....
V:3, H: 3, O: 100, B: 9.00, Colour: #000000
Activate the square layer,
Selections/ select all/ float/ defloat/ invert.
Activate your tube layer and hit delete on your keyboard.
Selections/ select none.
Change the layer opacity to Soft Light,
Duplicate layer.
3.Copy the main tube, paste as a new layer.
Image/ re-size, re-size to 330 pixels high.
Position to your liking and add your drop shadow.
Close this layer and your wordart layer.
4.Activate your square layer,
Layers/ Merge/ Merge Visible.
Re-name this layer to Square.
Re-open your other 2 layers.
Copy BNB-MMS1 and paste as a new layer.
Position to your liking.
Layers/ Duplicate layer, position again to your liking.
Duplicate as many times as you like remembering to move
them to different positions.
5.Activate Layers/ merge/ merge visible.
Move the entire image so it is central on your canvas.
Layers/ Duplicate, activate the bottom layer.
Image/ Re-size, re-size this layer to 550 pixels wide.
Centralize this layer.
Effects/ Texture effect/ Mosaic Antique,
Settings in the screenshot below.

6.Add a new raster layer and flood fill with a colour from your image.
I am using #3b75dc
Layers/ Arrange/ Send to the bottom.
Close your top layer,
Layers/ merge/ merge visible.
Effects/ Foto frame,
Settings in screenshot below.

7.Open up your top layer,
Add all copyright info, your name and save.
Labels:FTU Tutorials,UpYourArt
Thursday 5 May 2011
If All The Boys
Tutorial written by and © to Bits N Bobs 5th May 2011.
Results are for personal use only.
No monetry gain allowed and that includes placing them behind a paid or donation based membership area.
You are not allowed to share/forward or translate any of my tutorials or place them on any blog, website, DVD or anywhere else without my permission.
These tutorials are written from my own ideas and any similarities to any other tutorial is purely coincidental.
All tutorials are for those with a working knowledge of paintshop pro.
I reserve the right to amend these terms at any time.
Supplies needed.
Font of choice for your name.
I am using Pieces of Eight
Tube of choice.
I am using one by Guy Powers
Mine is GP1141 - Mermaid and available at UpYourArt
Tube is not to be used without the correct licence
You will also need my zip of supplies available here
These are re-coloured items from my Splash of colour kit so please do not share them.
Do not use them in other tutorials please unless you have purchased the kit.
Note
This tutorial was written in PSP 9.
Open all supplies in paintshop except the font.
Double click on your font and minimize.
Open a new image, 500 w x 500 h at 72 dpi.
1.Copy the 1st element, paste as a new layer onto your working image,
position to your liking, rename layer to 2.
Copy the 2nd element, paste as a new layer onto your working image,
position into the centre, rename layer to 3.
2.Un-hide the Mermaid from your tube image,
copy, paste as a new layer onto your working image.
Re-size the mermaid to 400 pixels wide, all layers un-tabbed.
Position to your liking, rename layer to 4.
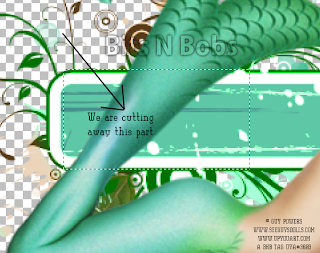
Using your lassoo tool cut away the piece of the tail covering the 2nd element.
See Screenshot below.
3.Add a new raster layer, rename layer to 5.
Using your lassoo tool with the following settings
Selection type: Freehand, Mode: Replace, Feather: 0, Smoothing: 0, Anti-alias tabbed
draw an area to create your sand as in screenshot below.
Flood fill with a sandy colour.
I am using #ebd4bc.
Adjust/ Add/Remove Noise/ Add Noise
Gaussian tabbed, 41%, Monochrome tabbed.
Adjust/ Blur/ Guassian blur, Radius: 1.00
Selections/ Select none.
Layers/ Arrange/ Move Down.
Position to your liking.
4.Activate your burn brush settings as in screenshot below.
Starting under the mermaids knee hold down your left mouse
button and drag along where the base of her legs and body
meet the sand all the way to the tips of her fingers.
You will see this area darkening.
Continue doing this until you are happy with the shadow
you have created. Clever huh ?
5.Copy the 3rd element, paste as a new layer and
position to your liking, rename as 6.
Copy the 4th element, paste as a new layer and
position to your liking, rename as 7.
Layers/ Arrange/ Bring to the top.
Selections/ Select all/ float/ de-float.
Selections/ modify/ expand, expand by 3.
Add a new raster layer, flood fill the selection with white # ffffff
You may need to flood fill the selection several times for a solid white.
Layers/ Arrange/ Move down.
Activate 7, Layers/ merge/ merge down, rename back to 7
6.Add any drop shadows if you want them.
I haven't added any other than the shading with the burn tool.
Layers/ Merge/ Merge visible.
Add all copyright info, export and save as a transparent png.
Tutorial written by and © to Bits N Bobs 5th May 2011.
Results are for personal use only.
No monetry gain allowed and that includes placing them behind a paid or donation based membership area.
You are not allowed to share/forward or translate any of my tutorials or place them on any blog, website, DVD or anywhere else without my permission.
These tutorials are written from my own ideas and any similarities to any other tutorial is purely coincidental.
All tutorials are for those with a working knowledge of paintshop pro.
I reserve the right to amend these terms at any time.
Supplies needed.
Font of choice for your name.
I am using Pieces of Eight
Tube of choice.
I am using one by Guy Powers
Mine is GP1141 - Mermaid and available at UpYourArt
Tube is not to be used without the correct licence
You will also need my zip of supplies available here
These are re-coloured items from my Splash of colour kit so please do not share them.
Do not use them in other tutorials please unless you have purchased the kit.
Note
This tutorial was written in PSP 9.
Open all supplies in paintshop except the font.
Double click on your font and minimize.
Open a new image, 500 w x 500 h at 72 dpi.
1.Copy the 1st element, paste as a new layer onto your working image,
position to your liking, rename layer to 2.
Copy the 2nd element, paste as a new layer onto your working image,
position into the centre, rename layer to 3.
2.Un-hide the Mermaid from your tube image,
copy, paste as a new layer onto your working image.
Re-size the mermaid to 400 pixels wide, all layers un-tabbed.
Position to your liking, rename layer to 4.
Using your lassoo tool cut away the piece of the tail covering the 2nd element.
See Screenshot below.

3.Add a new raster layer, rename layer to 5.
Using your lassoo tool with the following settings
Selection type: Freehand, Mode: Replace, Feather: 0, Smoothing: 0, Anti-alias tabbed
draw an area to create your sand as in screenshot below.
Flood fill with a sandy colour.
I am using #ebd4bc.
Adjust/ Add/Remove Noise/ Add Noise
Gaussian tabbed, 41%, Monochrome tabbed.
Adjust/ Blur/ Guassian blur, Radius: 1.00
Selections/ Select none.
Layers/ Arrange/ Move Down.
Position to your liking.
4.Activate your burn brush settings as in screenshot below.
Starting under the mermaids knee hold down your left mouse
button and drag along where the base of her legs and body
meet the sand all the way to the tips of her fingers.
You will see this area darkening.
Continue doing this until you are happy with the shadow
you have created. Clever huh ?
5.Copy the 3rd element, paste as a new layer and
position to your liking, rename as 6.
Copy the 4th element, paste as a new layer and
position to your liking, rename as 7.
Layers/ Arrange/ Bring to the top.
Selections/ Select all/ float/ de-float.
Selections/ modify/ expand, expand by 3.
Add a new raster layer, flood fill the selection with white # ffffff
You may need to flood fill the selection several times for a solid white.
Layers/ Arrange/ Move down.
Activate 7, Layers/ merge/ merge down, rename back to 7
6.Add any drop shadows if you want them.
I haven't added any other than the shading with the burn tool.
Layers/ Merge/ Merge visible.
Add all copyright info, export and save as a transparent png.
Labels:FTU Tutorials,UpYourArt
Subscribe to:
Posts
(Atom)
BNB Blinkie

Tuts Of The Week
Labels
- ! missing kits
- Alex Prihodko
- Amberly Berendson
- AMI
- Angela Newman
- Animated
- Arthur Crowe
- Autumn
- Babe-a-licious
- Bits N Bobs
- C.I.L.M
- Camilla Drakenborg
- CDO
- Christmas
- Competitions
- Cris Ortega
- Danielle Pioli
- Double Impact
- Easter
- Elegance Fly
- Elias Chatzoudis
- Elizabeth Austin
- Enamorte
- Exquisite Scraps
- Fantasia
- Forum sets
- Free Fonts
- FTU Tubes
- FTU Tutorials
- Gorjuss
- Gothic
- Incredimal Stationary
- Ismael Rac
- Italia Ruotolo
- James Jacks
- Jamie Kidd
- Jose Cano
- Karen Middleton
- KatNKDA
- KennyK
- Masks
- Maxine Gadd
- MPT
- MTA
- Mystical Scraps
- New Year
- Nice N Easy
- Nicholas Garton
- No scraps
- Orkus Art
- PFD
- PMTWS
- PTE
- PTU Tutorials
- Rachael Anderson
- Rachael Huntington
- Rachel Tallamy
- SATC
- Selena Fenech
- Shawn Palek
- Spring
- St.Patricks
- Steampunk
- Susan Mckirvergan
- Tag templates
- Thanksgiving
- UpYourArt
- Valentines
- Very Many
- Wilma4Ever
- ZlataM


